The sample work

Score : 6
Reflection
What did I learn
On this quarter, we did many things. At the beginning of the quarter we divided into 5 groups, which are 5 islands in Indonesia. I got Papua island. We need to research about traditional toys from our island. Each person in group have to research different answer from guiding questions, I assign to answer carpentry. Then, in the next meeting we are preparing for making laptopper to practice carpentry skill. After finishing the laptopper we continue to practice sewing skill with machine. It was my first time I practice my sewing skill. We made a pencil case with a logo. In the end of this quarter, we made a soto makassar with papua group. My group was winning the platting categories.
Why was this sample my best work
I chose this project as my best work because I put a lot of effort to make this lapptoper. I need to cutt the plywood, drill the holes, sand the plywood, and paint the plywood by my self.
What did I do well
I did well on this quarter was the laptopper because I satisfied with my effort and my score. From the project I learnt many thing such as, cutting skill, drilling skill, painting skill, and sanding skill. And also I have achieved my goals for this quarter.
How can I improve/ do differently
I think I need to improve my neatness and I need to focus when teacher explaining something. I hope I could get better in the next quarter.
Key Concept: Community
On this quarter we define into 5 islands in Indonesia, I got Papua group with Kezia, Tissa, and Rara. I think the teacher wants us to now more about culture in Indonesia. So far in this quarter we did many thing that connected with community. Because all project in this quarter such as, carpentry, sewing, and cooking was the strongest skill in Indonesia.
Soto Makassar
Ingredients
Supplementary material
Spice (mashed)
Another seasoning
Steps
- 250 grams beef
- 3 tablespoons oil
- 2 stalks lemongrass
- 3 tablespoons tauco
- 1 tablespoons brown sugar
- 1/2 teaspoon seasoning (optional)
Supplementary material
- Ketupat
- 2 stalks leek, cut into small pieces
- 2 tablespoons fried union
- 3 pieces lime
Spice (mashed)
- 4 cloves red onion
- 3 cloves garlic
- Pepper
- 1 tablespoons coriander, roasted
- 1/4 teaspoon cumin
- 1 cm ginger
- 3 cm galangal
- 50 grams peanut, roasted
Another seasoning
- 5 cm cinnamon
Steps
- Serve pan, poor the rice water and put the beef with the cinnamon into the pan
- Boil the beef until half-cooked
- Saute union and garlic until golden brown. Add spice which was mashed, lemongrass, and tauco. Saute until cooked
- Add the spice into the boiled beef
- Add brown sugar
- Boil until the beef cooked
- Get the beef and chop it and put it again
- Poor the soto into a bowl and garnish it.
Pencil Case
Evaluation
I had made a pencil case the size is 25 cm x 14 cm. The purpose of making this pencil case is for practicing sewing skill. The function of the pencil case is for contain stationary such as pencil, pen, sharpener, eraser, ruler, etc. There are many variety of material to make pencil case such as wood, plastic, metal, cotton, leather, etc. But I choose cotton because it easy to sew it. In my pencil case I decorate it with logo TIN. TIN means my nickname, because people usually call me Tin. My partner makes FL logo. There are many types of stitch style. I used different stitch style with my partner to make the logo. We have to sew 90-degree corner in every side to make the pencil case.
What has been the success?
The success of my pencil case was that I have fulfilled the size requirement on my pencil case; 25 cm x 14 cm. On this project another succeed of my pencil case were I could sew 90-degree angles in every corner, I could sew the zipper with straight line, and I could sew the logo. I could use the pencil case after the teacher gives score to me. I think my stiches in my pencil case is tight enough and nice enough so I confident to use my pencil case. Even though the pencil case is simple.
What has been the struggle?
While preparing for the sewing machine, I struggle to put the thread into the needle. The major struggle of the proses is to make the logo neat. Besides struggle to make the logo, sometimes the stitches would away from the line that I have made with tailor’s chalk. So I have to unpick the stitch with seam ripper and remake the stitch. Sometimes I would forget a little thing such as pushing down the handle then causing the thread stuck with the fabric.
What Can I do differently or better?
I think to make it better I have to manage my time effectively. Besides that I have to be more focus to insert the thread to the needle and to sew the fabric to make it straight.
What did you learn?
This is my first time to learn about how to use modern sewing machine. Sewing is very fun activities but sewing is not easy thing. From this activities I know where is the bobbin should be putted, how to wind the bobbin, how to insert the bobbin, and raise the thread in the bobbin. Besides that I learnt about how to make knot and 90-degree angle. This sewing machine has many varieties of stitch style so I can apply the stitch style that I want to my fabric for the logo. I also get some guidance from my partner and teacher during make the pencil case. I think I got a lot of information about sewing from this activity.
How to prepare the machine
How to make the pencil case
I had made a pencil case the size is 25 cm x 14 cm. The purpose of making this pencil case is for practicing sewing skill. The function of the pencil case is for contain stationary such as pencil, pen, sharpener, eraser, ruler, etc. There are many variety of material to make pencil case such as wood, plastic, metal, cotton, leather, etc. But I choose cotton because it easy to sew it. In my pencil case I decorate it with logo TIN. TIN means my nickname, because people usually call me Tin. My partner makes FL logo. There are many types of stitch style. I used different stitch style with my partner to make the logo. We have to sew 90-degree corner in every side to make the pencil case.
What has been the success?
The success of my pencil case was that I have fulfilled the size requirement on my pencil case; 25 cm x 14 cm. On this project another succeed of my pencil case were I could sew 90-degree angles in every corner, I could sew the zipper with straight line, and I could sew the logo. I could use the pencil case after the teacher gives score to me. I think my stiches in my pencil case is tight enough and nice enough so I confident to use my pencil case. Even though the pencil case is simple.
What has been the struggle?
While preparing for the sewing machine, I struggle to put the thread into the needle. The major struggle of the proses is to make the logo neat. Besides struggle to make the logo, sometimes the stitches would away from the line that I have made with tailor’s chalk. So I have to unpick the stitch with seam ripper and remake the stitch. Sometimes I would forget a little thing such as pushing down the handle then causing the thread stuck with the fabric.
What Can I do differently or better?
I think to make it better I have to manage my time effectively. Besides that I have to be more focus to insert the thread to the needle and to sew the fabric to make it straight.
What did you learn?
This is my first time to learn about how to use modern sewing machine. Sewing is very fun activities but sewing is not easy thing. From this activities I know where is the bobbin should be putted, how to wind the bobbin, how to insert the bobbin, and raise the thread in the bobbin. Besides that I learnt about how to make knot and 90-degree angle. This sewing machine has many varieties of stitch style so I can apply the stitch style that I want to my fabric for the logo. I also get some guidance from my partner and teacher during make the pencil case. I think I got a lot of information about sewing from this activity.
How to prepare the machine
- First turn on the sewing machine.
- Second we need to put the thread at the spool pin.
- Get the bobbin from the bobbin case and insert thread into the bobbin’s hole.
- Put the bobbin in the bobbin winder and wind the bobbin with the pedal.
- After fill the bobbin put the bobbin into the bobbin case again.
- Insert the thread into the needle.
- Raise the thread in the bobbin using hand wheel.
- You can start sewing and put the fabric on the feed dogs.
How to make the pencil case
- Measure the fabric 27 cm x 16 cm, cut the fabric and make line in every side 1 cm. make.
- Draw the logo in your fabric with tailor’s chalk.
- Prepare the sewing machine adjust the stitch length dial and choose the pattern of the stitches at the pattern selection dial.
- Make the logo with sewing machine. Before sewing in your fabric, you can use the scarp fabric to try the stitch styles that you have chosen.
- After make the logo you have to sew the zipper neatly. You can use pin to help you control the zipper. Use the straight stitch style.
- Still use the straight to sew every fabric side.
- Finally the pencil case is done.
Laptopper
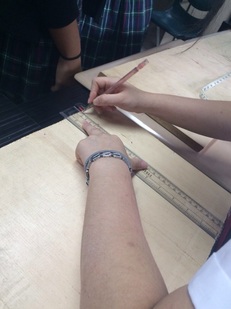
Measure your laptop and draw rectangle in the plywood. Then, draw 4 holes (2 in the top and 2 in the bottom)

Make sure the rectangle in the plywood is enough for your laptop
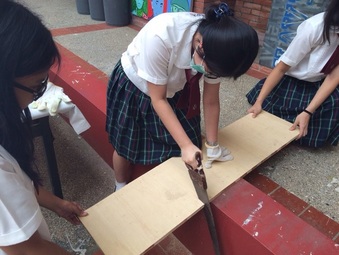
Cut the wood with hand saw

Sand the plywood with sand paper until the plywood is smooth
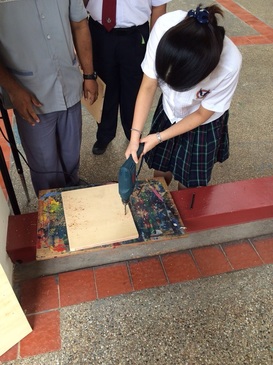
Drill the holes with drilling tool
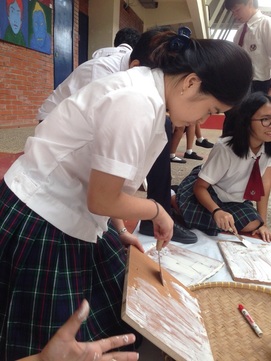
Coat the plywood with primer coat. Don't apply the primer too thick and too thin. After the primer dry, sand it again with sandpaper until it smooth
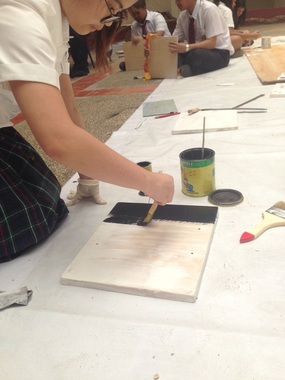
Start to paint the base of the plywood and use big brush, so it make more effective.
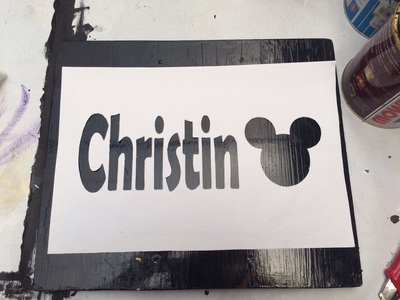

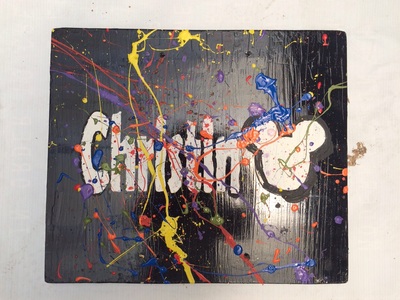
Make a own template, then paint it with smaller brush. After that, use a stick to make some pattern in the plywood
Evaluation
It hard to use saw hand because it needs more energy.
When I'm sanded the plywood my skirt were getting dirty.
To make sure the primer is not too thin or too thick.
When sanded the plywood I have used apron.
When applied the primer, used one way method.
Use thicker paper for the template and put double tape in the back of paper as many as I can. So, the results will clean.
How to make a hole use drill
How to make the wood to be smooth use sand paper
- Success
- Struggle
It hard to use saw hand because it needs more energy.
When I'm sanded the plywood my skirt were getting dirty.
To make sure the primer is not too thin or too thick.
- How it could be better
When sanded the plywood I have used apron.
When applied the primer, used one way method.
Use thicker paper for the template and put double tape in the back of paper as many as I can. So, the results will clean.
- I learnt about
How to make a hole use drill
How to make the wood to be smooth use sand paper
